
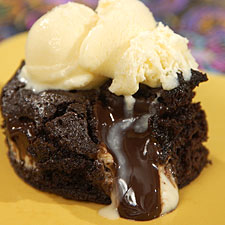
Ooey-Gooey Melty-Minty Brownies
What’s deep, rich chocolate on the top and bottom, creamy melted mint in the middle, and simply delicious all the way through? Ooey-Gooey Melty-Minty Brownies! These mint-filled fudge brownies, a WOW dinner-party dessert when you serve them warm from the oven. Or serve ’em fully cooled; they’re just as tasty.
Yield: Two dozen 2 1/4 inch square brownies, or 2 dozen 2 1/4 inch" round brownies (with plenty of scraps left over for the baker!)
Ingredients
- 1 cup (8 ounces, 2 sticks) unsalted butter
- 2 1/4 cups (15 3/4 ounces) sugar
- 1 1/4 cups (3 3/4 ounces) Dutch-process cocoa
- 1 teaspoon salt
- 1 teaspoon baking powder
- 1 teaspoon espresso powder (optional)
- 1 tablespoon vanilla extract
- 4 large eggs
- 1 1/2 cups (6 1/4 ounces) King Arthur Unbleached All-Purpose Flour
- 24 ounces dark chocolate mint cup candies* or about 16 ounces dark chocolate-covered peppermint patties
Instructions
- Heat the oven to 350 degrees F. Lightly grease a 9 x 13 inch pan, or two 9 inch round cake pans. Line them with parchment, and grease the parchment. You can skip the parchment if you like, but it does ensure the sticky brownies will release from the pan in one piece. Note: If you’re not sure your entire audience likes mint brownies, use just half the candies, and make one 9" round pan of mint brownies, the other plain.
- In a medium-size microwave-safe bowl, or in a saucepan set over low heat, melt the butter, then add the sugar and stir to combine. Return the mixture to the heat (or microwave) briefly, just until it's hot (about 110 degrees F to 120 degrees F), but not bubbling; it'll become shiny looking as you stir iit. Heating this mixture a second time will dissolve more of the sugar, which will yield a shiny top crust on your brownies.
- Stir in the cocoa, salt, baking powder, espresso powder and vanilla extract.
- Whisk in the eggs, stirring until smooth; then add the flour, again stirring until smooth.
- Spoon the batter into the 9 x 13 inch pan, or divide it evenly between the 9 inch round pans.
- Space the mint candies evenly on the surface of the batter, pressing them down in so just their tops are showing.
- Bake the brownies in a preheated 350 degrees F oven for 28 minutes, until a cake tester inserted into the center comes out clean, or with just a few moist crumbs clinging to it. The brownies should feel set on the edges and in the center (barely); the mint cups will be molten, and will have sunk and made little pockets in the brownies.
- Remove the brownies from the oven.
- If you’ve made the brownies in two round pans, after 30 minutes turn them out of the pans onto a piece of parchment. How do you do this? First, loosen the edges with a table knife. Then place a cooling rack on top of the pan, and turn pan and rack upside down, so that the brownies drop onto the rack. Then put a piece of parchment over the upside-down brownies (you want to get them right side up again), and a plate or rack atop the parchment, and flip the whole business again, so the melting pools of chocolate are on top, and sitting on a piece of parchment.
- Note: You can skip all of this and cut them into serving pieces right in the pan, if you like; but if you feel pretty confident with the flipping, being out of the pan does give you more elbow room as you cut them into serving pieces.
- Cut the brownies into squares (if they’re in the rectangular pan) or, using a 2- to 2 1/4-inch biscuit cutter, into rounds, removing each from the pan and putting it on a serving plate as soon as you cut it. Top with vanilla ice cream, if desired.
Notes
* Dark chocolate mint cups look like Reese’s Pieces (miniature) peanut butter cups, only they’re filled with mint instead of peanut butter. Peppermint patties (I used York brand) are thinner (which is why you need less of them by weight). They still provide a nice mint "ooze."
The brownies’ mint centers will flow like lava if you serve them as soon as you cut them. You may also choose not to cut them until they’ve cooled for 60 to 90 minutes; that’s fine. The center will still ooze nicely, though it won’t flow.
Attribution
Recipe and photo used with permission from: King Arthur Flour